Article Summary
- Maui’s wind environment—trade winds, kona storms, and hurricane threats—creates roofing demands that most contractors outside Hawaii have never encountered
- Hawaii’s building code sets specific wind load requirements, but code minimum and weather-resilience are not the same thing
- The installation details that determine wind performance are mostly invisible once a roof is finished—you have to know what to ask before work begins
- Certain roofing materials and systems perform dramatically better in high-wind conditions than others
- A contractor’s track record after storms tells you more about their work quality than any sales pitch will
- Because standard practices from the mainland frequently fail under these extreme coastal forces, understanding the structural differences between hiring off-island vs. local Maui roofing contractors is vital for long-term weather protection.
There’s a particular feeling that comes with watching a serious weather system track across the Central Pacific toward Hawaii. You check the forecast obsessively. You fill the bathtub. You move the patio furniture inside. And at some point, you look up at your roof and wonder—honestly wonder—whether it’s going to hold.
That feeling is one of the better motivators for asking harder questions before you hire a roofing contractor on Maui. Because the difference between a roof that survives a major wind event and one that doesn’t usually isn’t about luck. It’s about the decisions made during installation—decisions about fastener patterns, material specifications, flashing details, and edge conditions that were made months or years before the storm arrived.
Finding a roofing contractor on Maui who builds for genuine weather resilience means understanding what that actually requires, and knowing how to evaluate whether a contractor is delivering it. That’s what this article covers.
Understanding Maui’s Wind Environment
Before getting into contractor selection, it’s worth understanding exactly what kind of wind exposure Maui roofs actually face. The island doesn’t have one wind environment—it has several, and they’re meaningfully different from each other.
The Trade Winds
The northeast trade winds are the constant. They blow reliably across the island’s windward side for much of the year, typically at 15 to 25 mph, with stronger gusts during certain seasons. For most of the year, trades are a blessing—they moderate temperatures and keep the air moving. For roofs, they represent sustained directional pressure that, over time, stresses fasteners, works at seams, and gradually compromises any installation detail that wasn’t done with that pressure in mind.
The windward faces of homes in Pa’ia, Ha’iku, and along the north shore see this pressure day after day, year after year. Roofing materials on the northeast-facing slopes of these homes wear differently from those on sheltered leeward planes. A contractor installing a roof in these areas without thinking about sustained trade wind loading is missing something important.
Kona Storms and Wind Reversal
Several times a year—most commonly in winter—the trade wind pattern breaks down and southerly or southwesterly winds take over. These kona conditions bring weather from a completely different direction than the trades, which means they hit roof planes and flashing details that are normally sheltered. Homes on the leeward south shore of Maui—Kihei, Wailea, Makena—that typically sit in the trade wind rain shadow suddenly face heavy rain and gusty winds from an unexpected direction.
This is why a well-installed roof on Maui needs to perform in multiple wind directions, not just against the prevailing trades. Flashing at roof-to-wall intersections, valley treatments, and edge metal all need to account for the possibility that the wind won’t always come from where it usually does.
Hurricane Threats and Direct Impacts
Maui sits in the Central Pacific hurricane corridor. While catastrophic direct landfalls are historically rare, the island has experienced significant wind and rain from storms tracking nearby—and the risk of a more direct impact is real enough that building to handle it is simply responsible planning.
Hawaii’s building code acknowledges this. Wind load requirements for residential construction in Hawaii are derived from ASCE 7 wind speed maps that reflect the actual historical and probabilistic wind risk in the state. For most of Maui, design wind speeds range from roughly 85 mph in relatively sheltered inland areas to well over 100 mph in exposed coastal and ridgeline locations. A roofing system installed to these standards is meaningfully more resilient than one installed to mainland norms.
Channeling Effects and Microclimates
One of the more localized aspects of Maui’s wind environment is the channeling effect created by the island’s geography. The gap between Maui and Moloka’i accelerates wind through the Pailolo Channel. The Ko’olau Gap between the West Maui Mountains and Haleakala funnels trade winds and creates localized conditions that are significantly windier than nearby areas. Properties in Kahului, Ma’alaea, and along the central valley floor regularly see wind conditions that exceed what the broader regional forecast suggests.
A contractor who knows the island understands that a project in central Maui may require different wind detailing than a project in a sheltered Kihei neighborhood—even if both fall under the same broad building code wind zone on paper.
What Hawaii’s Building Code Actually Requires
Hawaii’s building code establishes minimum standards for wind resistance in roofing systems. Understanding what those standards mean—and where they stop—is useful context for any homeowner.
The Basics of Wind Load Design
Hawaii adopts the International Building Code with state-specific amendments. For wind loading, the relevant standard is ASCE 7, which establishes design wind speeds by location and assigns exposure categories based on site characteristics. The three primary exposure categories that matter for residential roofing:
Exposure B applies to suburban and residential areas with closely spaced structures and moderate vegetation—think interior neighborhoods in Wailuku or Kahului. This is the least demanding wind exposure category.
Exposure C applies to open terrain with scattered obstructions—coastal areas, open fields, or properties at the edges of developed areas. Much of Maui’s coastline and rural areas fall here.
Exposure D applies to flat, open terrain facing large bodies of water. Beachfront properties and oceanfront locations on Maui’s coast can fall into this most demanding category.
These exposure categories directly affect the wind pressures a roofing system must be designed to resist. A home on an exposed beachfront lot in Exposure D faces significantly higher code-required wind resistance than a sheltered home in Exposure B—even if they’re only a few miles apart.
Code Minimum vs. Weather-Resilient
Here’s a distinction worth sitting with: meeting Hawaii’s building code for wind resistance is the legal floor, not the performance ceiling. Code minimum means the structure should survive the design wind event without collapse or catastrophic failure. It doesn’t necessarily mean the roof comes through a major storm without any damage.
A contractor who talks only about meeting code is telling you they’ll hit the minimum standard. A contractor who understands weather-resilient installation goes beyond that baseline—more aggressive fastening at high-uplift zones, better-specified materials, more careful attention to the details at ridges, eaves, and penetrations where failures concentrate during wind events. The gap between code minimum and genuinely weather-resilient installation is where a contractor’s actual expertise shows up.
The Installation Details That Determine Wind Performance
Most of what makes a roof weather-resilient or not is invisible once the job is finished. The decisions that matter are made during installation, and by the time a storm tests them, it’s too late to change anything. Here’s what those decisions look like in practice.
Fastener Selection and Pattern
Fasteners are the connection between your roofing material and your home’s structure. Their specification and placement are among the most consequential installation decisions a contractor makes.
For asphalt shingles, the standard installation pattern places fasteners in a specific zone on each shingle. High-wind installation upgrades this: more fasteners per shingle, fasteners placed in the sealant strip zone rather than above it, and tighter fastener spacing at perimeter zones—eaves, rakes, ridges, and hips—where wind uplift forces are highest. The difference between a four-nail and a six-nail installation pattern sounds minor. In a wind event, it isn’t.
For metal roofing, fastener type matters as much as pattern. Exposed fastener systems use screws that penetrate the panel face; concealed fastener systems (like standing seam) hide fasteners beneath overlapping panels. Standing seam metal roofing generally outperforms exposed fastener systems in high-wind conditions because the fasteners aren’t directly exposed to uplift forces. When exposed fasteners are used, the washer and sealant condition of those fasteners degrades over time in Hawaii’s UV environment and requires periodic inspection and maintenance.
In coastal Maui locations, fastener material specification is critical: stainless steel or aluminum fasteners resist salt air corrosion far better than standard galvanized steel, which can fail structurally as corrosion progresses.
Roof Deck Attachment
The roofing material attaches to the roof deck. The roof deck attaches to the framing. Both connections need to be strong enough to handle wind uplift—the force that tries to pull the roof up and away from the structure.
Hurricane clips and straps at rafter-to-wall plate connections are a structural component, not strictly a roofing component. But a contractor doing a full re-roofing has visibility into this connection during tear-off and can identify where upgrades might be appropriate. A contractor who doesn’t look at the deck attachment condition during a re-roofing job is missing an opportunity to improve the whole system’s wind performance.
Roof deck panels—typically OSB or plywood—should be fastened to the framing with a pattern that meets or exceeds the wind load requirements for the site. Deck panels that are delaminating, improperly fastened, or damaged from moisture are a weak point in the whole assembly.
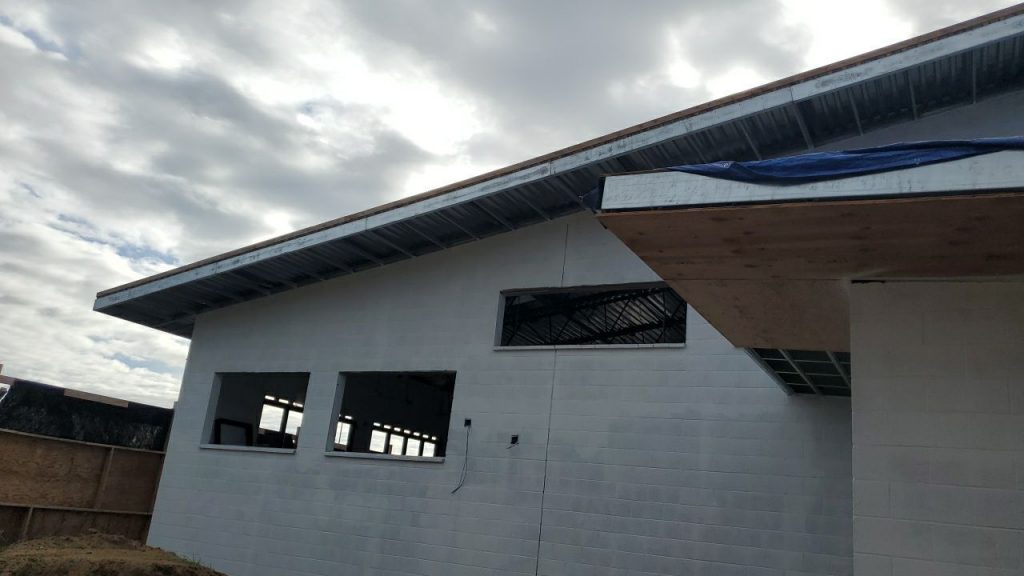
Edge Metal and Perimeter Details
The eave and rake edges of a roof are among the most vulnerable points in a wind event. Wind gets under improperly secured edge metal, finds purchase, and peels. What looks like a roofing failure is often an edge metal failure—the flashing lifted, the underlayment followed, and everything above it was compromised.
Properly installed drip edge and rake metal should be mechanically fastened at close intervals, integrated correctly with the underlayment (drip edge goes over the underlayment at eaves, under at rakes—the detail reverses depending on location, and getting it backward creates a water management problem), and sealed at joints and terminations. On Maui, where salt air accelerates corrosion, edge metal should be aluminum rather than galvanized steel in coastal locations.
Ridge and Hip Treatment
Ridges and hips are the high points of a roof where wind vortices form during storms. These areas see some of the highest uplift and suction forces anywhere on the roof surface. Ridge caps—whether asphalt shingle caps, metal closures, or foam-filled ridge vents—need to be fastened aggressively and sealed against wind intrusion.
On metal roofing, ridge closures that use open-cell foam can allow wind-driven rain to infiltrate at the ridge in severe conditions. Solid or foam-filled closures with properly lapped and fastened metal ridge caps perform better. On tile roofing, ridge tiles should be mortared in place rather than simply friction-fit, particularly on exposed Maui locations.
Flashing at Penetrations and Transitions
Every pipe, vent, skylight, and wall intersection that passes through or terminates at a roof surface is a potential wind and water intrusion point. Flashing at these locations has to seal against both downward rain and wind-driven rain that approaches horizontally or upward at low angles.
Step flashing at roof-to-wall intersections, counter flashing that overlaps it, pipe boot flashings around vent penetrations, and saddle flashings at uphill sides of chimneys and mechanical equipment—all of these need to be installed with the understanding that water will occasionally come from an unexpected direction. Caulk-only flashing repairs on these details are temporary at best; properly lapped and mechanically fastened metal flashing is the right answer.
Roofing Materials and Wind Performance
Not all roofing materials perform equally in high-wind conditions. Understanding the differences helps you have a more productive conversation with any contractor you’re evaluating.
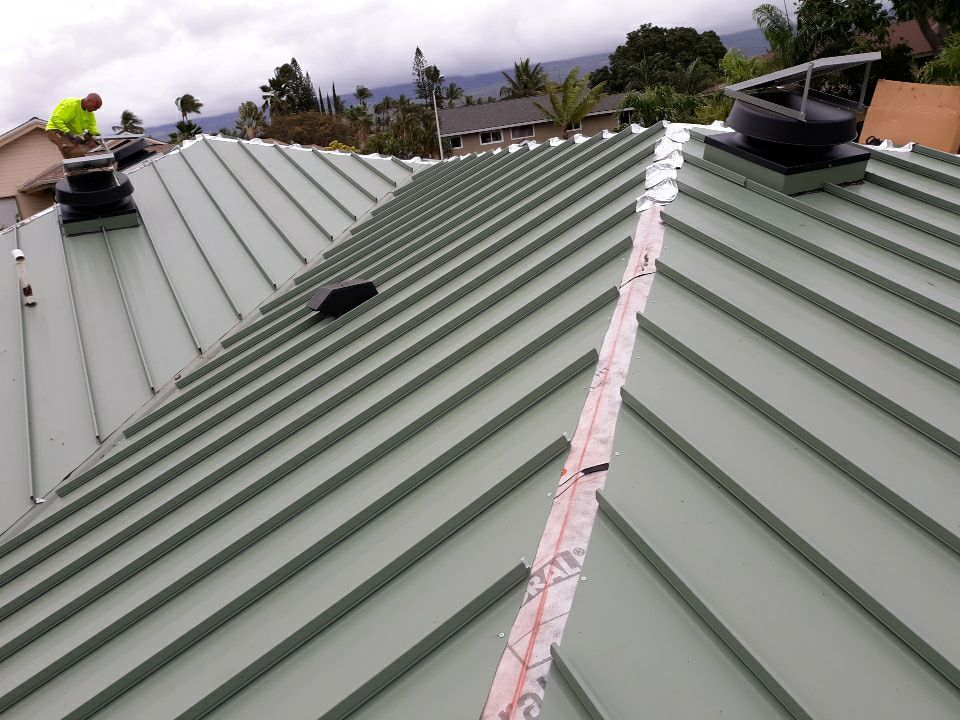
Standing Seam Metal Roofing
Standing seam is widely regarded as the strongest performer in high-wind conditions among residential roofing options. The concealed fastener design means fasteners are not exposed to direct uplift or corrosion. The continuous panel design from ridge to eave eliminates the horizontal lap joints that are a vulnerability in other systems. When properly installed with appropriate clip spacing and panel gauge, standing seam metal roofs have performed well in some of the most severe wind events in Hawaii and other hurricane-affected regions.
The trade-off is upfront cost—standing seam is among the more expensive residential roofing options. For a Maui home in an exposed location with a long ownership horizon, that cost typically makes financial sense over time. For a homeowner with a more limited budget or a shorter planning window, other options can still perform respectably if installed correctly.
Exposed Fastener Metal Roofing
Corrugated and ribbed metal panels with exposed fasteners are common throughout Maui. They perform well in wind when properly installed—correct fastener type, correct spacing, correct sealant at laps and flashings. The maintenance consideration is more significant than with standing seam: exposed fasteners and the rubber or neoprene washers that seal them need periodic inspection and replacement, particularly in coastal salt air environments where material degradation is faster.
Impact-Resistant Asphalt Shingles
Class 4 impact-rated shingles are made with a modified asphalt formulation that resists both impact damage and wind uplift better than standard architectural shingles. They’re tested to specific wind speed ratings, and some Hawaii insurance carriers offer premium discounts for roofs using Class 4 materials. On Maui, where the combination of UV exposure and wind stress is significant, the upgrade from standard architectural shingles to a Class 4 product is often worth the incremental cost.
Any asphalt shingle installation in a high-wind Hawaii location should use six fasteners per shingle rather than the four-nail standard, and the sealant strip—the factory-applied adhesive band on each shingle—should be activated by heat or supplemented with hand-sealing on the bottom courses where wind uplift is highest.
Concrete and Clay Tile
Tile roofing presents an interesting wind performance picture. The tiles themselves are heavy, which works in their favor against uplift in moderate conditions. But improperly fastened tiles can become dangerous projectiles in severe wind events, and the underlying structure has to be sound enough to handle the weight.
Modern tile installation uses mechanically fastened field tiles rather than relying solely on mortar bedding, which can fail as it ages. Hip and ridge tiles should be mortared and, in exposed locations, pin-fastened as well. The underlayment beneath a tile roof is the actual waterproofing layer—and it typically has a shorter service life than the tile itself. A well-installed tile roof with quality underlayment and properly fastened tiles performs reasonably well in high wind; an older tile roof with aged underlayment and loose ridges is a significant vulnerability.
TPO and Membrane Roofing on Low-Slope Sections
Flat and low-slope roof sections on Maui homes are almost always finished with membrane roofing—TPO, modified bitumen, or occasionally EPDM. Wind uplift on flat roofs works differently than on pitched surfaces: rather than peeling from the edge, membrane roofs tend to fail at perimeter terminations and seam locations when wind creates suction pressure across the flat surface.
Properly installed TPO uses heat-welded seams—a thermal fusion process that creates a bond that’s essentially as strong as the membrane itself. Adhesive-bonded seams are a lesser alternative. Perimeter termination bars should be mechanically fastened at close intervals, and any roof penetrations need to be sealed with appropriate membrane flashing that’s fully integrated into the roof field. In Hawaii’s UV environment, a reinforced membrane formulation is worth specifying over a basic TPO product.
After the Storm: What a Contractor’s Track Record Reveals
One of the most telling ways to evaluate a roofing contractor’s actual wind-resistance performance is to ask about their work after storms.
A contractor who has been working on Maui for years has inevitably had roofs they installed go through significant weather events. Ask them about it. How many callbacks have they gotten after storms? What were the issues? How did they respond? What did they learn and change?
A contractor who’s done this work well will have stories about roofs that came through storm events without incident. They’ll be able to explain why—what installation choices they made that protected those homes. They may also have stories about early work where they learned something and changed their approach. That kind of honest, experience-based answer is more valuable than a generic claim about quality.
A contractor who can’t recall any specific instances of storm performance feedback—good or bad—either hasn’t been working here long enough to have that history, or hasn’t been paying attention to it.
References From Storm-Affected Homeowners
When you ask a contractor for references, ask specifically for homeowners whose roofs went through a major weather event after the contractor installed them. A homeowner who can tell you their roof came through a kona storm or a hurricane brush without a single leak is giving you more meaningful quality information than a homeowner who simply says the contractor was professional and the job looked nice.
Not every reference will have experienced a major storm. But a contractor working on Maui for several years should be able to identify at least a few customers whose roofs have been weather-tested.
Questions to Ask a Contractor About Wind-Resilient Installation
When you’re evaluating roofing contractors on Maui for weather resilience specifically, these questions separate contractors who have thought seriously about it from those who haven’t.
What wind exposure category does my property fall under, and how does that affect your installation approach?
A contractor who knows wind load design will be able to give you a specific answer about your site’s exposure category and explain what changes in their installation as a result. A vague or generic answer suggests they haven’t thought about it in site-specific terms.
What fastener pattern do you use for shingles or metal panels, and does it change at roof perimeters?
The correct answer involves higher fastener density at eaves, rakes, ridges, and hips—the perimeter zones where uplift forces are highest. A contractor who uses the same fastener pattern everywhere is applying a one-size approach to a variable-load problem.
How do you handle the ridge and hip details on an exposed Maui location?
Listen for specifics: aggressive mechanical fastening of ridge caps, foam-filled or solid ridge closures on metal roofs, mortared ridge tiles on tile roofs. Generic answers about following manufacturer instructions are a starting point, not a complete answer.
What edge metal do you use, and how do you fasten and seal it?
The answer should include material specification (aluminum in coastal locations), fastener spacing (typically every 4 to 6 inches in high-wind details), and integration with underlayment. If the answer is “we use whatever comes with the shingles,” that’s a flag.
Have any of your Maui installations gone through significant storms? What happened?
As discussed above, the answer to this question—and the specificity and honesty with which it’s delivered—tells you a lot about a contractor’s actual track record.
Do you carry wind-event roofing damage repair work, and what do those callbacks typically involve?
A contractor who does repair work on storm-damaged roofs understands failure modes from direct experience. Ask them what they see most often. The answer reveals a lot about what installation shortcuts create the most problems.
Red Flags That Suggest a Contractor Hasn’t Thought About Wind Resilience
Beyond the questions, a few observable signs suggest a contractor isn’t approaching wind resilience seriously.
They can’t distinguish between your site’s wind exposure and a generic standard. A beachfront property in Ma’alaea and a sheltered home in Pukalani face fundamentally different wind loads. A contractor who treats them the same doesn’t understand site-specific wind design.
Their material spec sheet is thin on detail. A bid that lists “30-year architectural shingles” without specifying wind rating, manufacturer, or installation pattern is leaving critical decisions undefined. Weather-resilient installation starts with clear material specifications.
They don’t discuss perimeter zones differently from field areas. The eave, rake, ridge, and hip zones of a roof are where wind failures concentrate. A contractor who doesn’t talk about those zones differently when discussing wind performance either doesn’t know or doesn’t care.
They suggest upgrades only when asked. A contractor genuinely committed to weather-resilient work will proactively recommend the high-wind fastening pattern, the Class 4 shingle upgrade, the standing seam over exposed fastener metal, and the solid ridge closure. If these options only appear after you’ve pushed for them, the contractor’s default mode isn’t weather-resilient.
They’re vague about permit compliance for wind load. Pulling a permit on a re-roofing project in Maui County means the work will be inspected against the building code’s wind load requirements. A contractor who is vague about permits is possibly vague about code compliance—and those two things are connected.
Hurricane Season Preparation: What Your Roof Should Be Able to Do
Hurricane season in the Central Pacific runs from June through November. Before that window opens each year, it’s worth knowing what your roof can and can’t handle—and taking steps to address vulnerabilities before they’re tested under the worst possible conditions.
A Pre-Season Inspection Is Worth Scheduling
A qualified roofing contractor should be able to assess your roof’s wind-resilience condition before hurricane season and give you a clear picture of what’s solid, what’s marginal, and what needs attention. That assessment should cover:
- Edge metal condition—is it properly fastened and intact at all eave and rake edges?
- Ridge and hip condition—are caps firmly fastened with no lifting at corners or ends?
- Flashing integrity at all penetrations and roof-to-wall connections
- Any lifted, loose, or missing shingles or panels that represent an immediate vulnerability
- Gutter attachment—heavy rain during a storm can overwhelm gutters, and improperly attached gutters can pull fascia down with them
A pre-season inspection is also a good time to document your roof’s current condition with photographs. If you end up filing a storm damage claim later, having documented pre-storm conditions makes the claims process cleaner.
What to Do After a Wind Event
After any significant storm—even one that tracks away from Maui—walk your property perimeter and look for visible evidence of damage. Shingles on the ground, lifted panel edges, displaced ridge caps, debris blocking downspouts, and new water stains on interior ceilings all warrant a professional inspection.
Don’t wait for visible leaking before getting an inspection. Wind damage to flashings, fasteners, and edge metal often creates conditions that won’t produce a leak until the next rain event—which may be weeks away. Catching the damage between storms gives you time to make repairs before the next test.
The Real Cost of a Roof That Isn’t Built for Wind
It’s worth being direct about what’s at stake when a roof isn’t weather-resilient on Maui.
A roof failure during a major wind event doesn’t just mean a repair bill. It means interior damage—water in your walls, ceiling, insulation, and potentially your electrical system. It means mold remediation in a climate where organic growth takes hold fast. It means living somewhere else while repairs are made, which in Hawaii’s housing market carries real costs. And it means an insurance claim process that can be complicated, lengthy, and sometimes contentious about what the policy covers and what it doesn’t.
The difference in upfront cost between a standard installation and a weather-resilient installation—better fastener patterns, upgraded materials, more careful perimeter detailing—is typically a fraction of the cost of addressing the downstream consequences of a roof that fails when tested.
Choosing a roofing contractor on Maui who builds for genuine weather resilience is one of the most financially sound decisions a homeowner can make. The work is largely invisible once it’s done. The results show up only when the wind picks up—and on Maui, it always does eventually.
Ready to Talk About a Wind-Resilient Roof?
Maui Roofs & Repairs builds roofing systems designed for what Maui’s weather actually delivers—not what the mainland assumes. From high-wind fastening details to coastal material specifications to pre-hurricane season inspections, we bring the kind of local knowledge that makes a real difference when conditions get serious.
Contact us to schedule an inspection or get a detailed estimate for a roof that’s ready for whatever the season brings.